The Sync desktop application – Mac CloudFiles (Beta)
Note:
- This guide is for the macOS CloudFiles 5.x Beta desktop app.
- Click here for the macOS 2.x stable desktop app guide.
- If you’re setting up Sync on Windows click here.
The Sync desktop app for macOS makes it easy to backup, share, and access your files and folders stored in Sync, directly from your computer.
In this article:
- How do I download and install the Sync desktop app?
- Accessing the Sync app and Sync folder on your computer
- Adding files to Sync from your computer
- Free up space on your computer with Sync CloudFiles
- Syncing status icons
- CloudFiles default settings and bulk actions
- Using the Quick Action menu to share and open on web
- Desktop app settings
- Pause and resume the desktop app
- Updating the Sync desktop app to the latest version
- What version of Sync am I currently running?
- Uninstalling Sync on Mac
- I upgraded from an older version of Sync for Mac, what’s changed?
How do I download and install the Sync desktop app?
Minimum requirements:
- The Sync CloudFiles desktop app is available for macOS 13+, and Windows 10+.
- You’ll need admin privileges on your computer to install and run Sync.
- Sync for Mac does not support external or network drives.
Installation:
- Download the desktop app installer to your computer.
- Double click the .dmg file to open it.
- Drag the Sync app to the Applications folder.
- Navigate to the Application folder and launch the Sync app to start the installer:
- Launch Finder (click on Finder on the Dock).
- From the Favorites sidebar click Applications.
- From the Applications folder click Sync and follow the installation prompts.
Before you get started:
- You may be prompted to enter an admin password if you’re installing under a standard Mac user, as Sync requires administrator rights to run.
- Have multiple computers? When you install Sync on your additional computers, all your files in Sync will automatically synchronize to each computer.
Accessing the Sync app and Sync folder on your computer
When you install the Sync desktop app, two things are added to your computer:
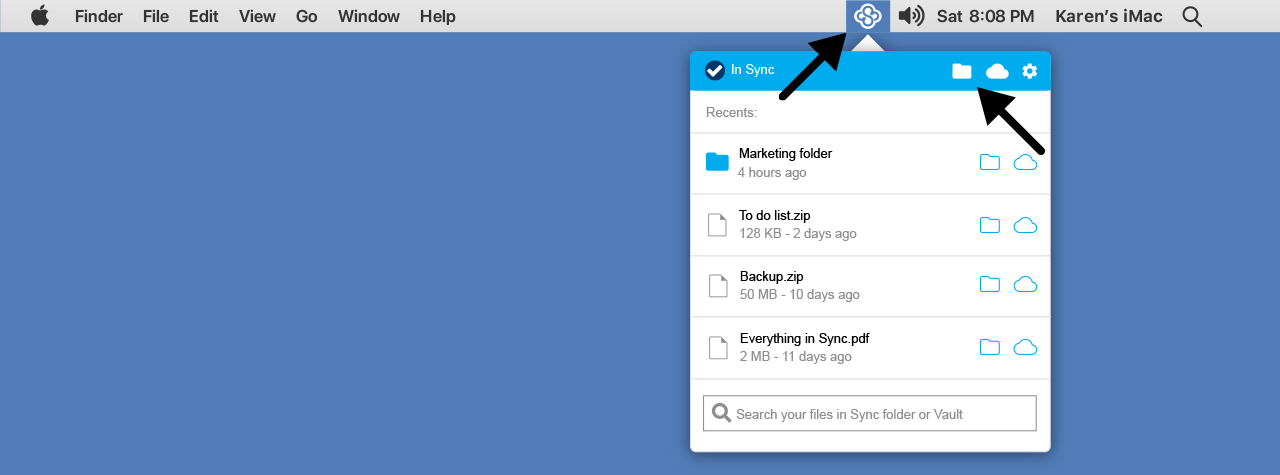
- The Sync icon in your Mac menu bar
- The Sync folder in Mac Finder
The Mac menu bar is located at the top right corner of your screen.

Finding the Sync folder on your computer:
- Click the Sync icon on the Mac menu bar.
- Click the Sync folder icon.
This opens the Sync folder in a new window on your computer.
Adding files and folders to Sync, from your computer
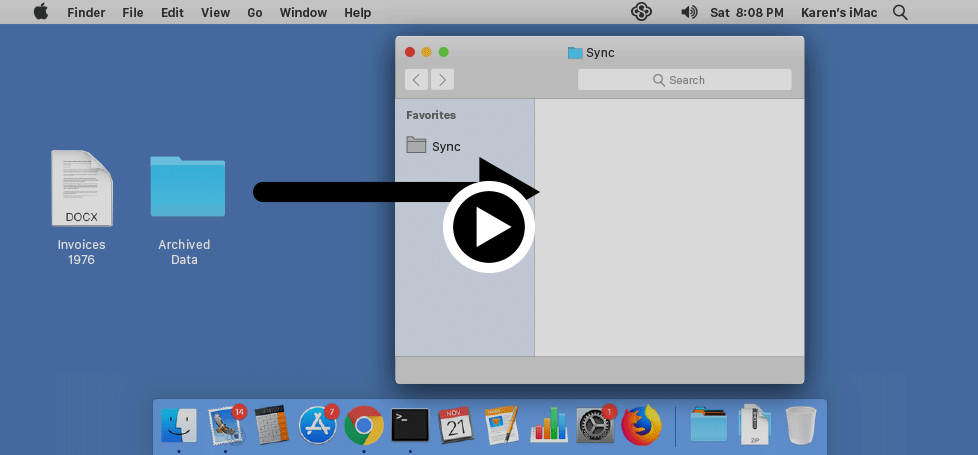
Once you have installed the Sync desktop app you can drag and drop files or folders directly into the Sync folder on your computer. Additionally, you can use the Save As… file menu option in most applications, to save files to your Sync folder.

- Click the Sync icon on the Mac menu bar.
- Click the Sync folder icon to open the Sync folder.
- Open a new Finder window and copy, move, or drag your files to the Sync folder.
Notes:
- Files in your Sync folder are automatically uploaded (synced) to the cloud.
- File revisions are automatically uploaded whenever a file changes, ensuring the latest version is always backed up.
Before you get started:
- Are you planning on sharing a folder with more than 30,000 files? Create an empty folder and share it first, before uploading files into the folder.
- Files you add to the the Sync folder take up space on your computer by default. This means if you are uploading 1 GB of data, you’ll need 1 GB of free space on your computer.
- Use Sync CloudFiles to free up space on your computer. With CloudFiles, a 1 GB file does not take any space on your computer unless you open or access it.
Free up space on your computer with Sync CloudFiles
Sync CloudFiles is a files on-demand feature that lets you see your files right from Mac Finder, and they don’t take up space on your computer.
How to save space with CloudFiles:
- Open Mac Finder.
- Open your Sync folder from the Locations side-bar.
- Right-click the file or folder you’d like to set to cloud-only.
- Click Remove Download.
This will convert the file into a cloud-only placeholder. These settings are unique to each computer Sync is installed on, and override any defaults.
How to make files and folders always available:
- Right-click the file or folder you’d like to keep stored on your computer.
- Click Download Now.
This will download the file back to the computer. You need to Internet connection to download cloud-only files back to your computer.
Notes:
- Double-clicking or opening a file directly automatically downloads it to the device.
- New files or folders created on the web panel, synced from other devices, or shared to you from other Sync users will appear as cloud-only by default. Adjust the default settings to change this.
- If a folder is cloud-only, you can still mark individual files within that folder as always available.
Syncing status icons
Sync adds status icons to every file and folder in your Sync folder. This makes it easy to keep track of cloud-only files, files downloaded to the device, and files in the process of syncing.
![]()
 |
No status icon icon – Files and folders that are downloaded to your device won’t have a status icon. These files are on your device, take up space, and can be opened even when you’re offline. |
 |
Cloud with down arrow icon – Indicates that the file or folder is only available in the cloud. Cloud-only files don’t take up space on your computer, and can only be opened when your device is connected to the Internet. |
 |
Cloud with exclamation point – Indicates that the file or folder is excluded from syncing due to an incompatible name or a technical issue. Click here to troubleshoot an excluded status icon. |
 |
Circle with progress – Indicates that the file or folder is downloading to your computer. If the icon persists for a long time, it could mean the file is very large and taking time to download, or the file is stuck. |
CloudFiles default settings and bulk actions
The app will display a status icon in the Windows system tray or Mac menu bar that shows overall syncing status.
Note: CloudFiles Default settings are configurable on macOS 13+. If you’re running macOS 11 or 12, CloudFiles is available at the file and folder level only (this tab will not be visible).
For macOS 13+, access advanced CloudFiles settings here:
- Click the Sync icon on the Mac menu bar.
- Click the Settings icon.
- Select Preferences from the menu.
- Click the CloudFiles tab.
Adjust the default behaviour as follows:
Keep newly added files on the cloud or Download all newly added files
- Choose Keep newly added files on the cloud to make files that sync to your computer remotely from the web, other devices, or folders shared with you cloud-only by default.
- Choose Download all newly added files to always download these files.
Save disk space by sending all files I haven’t opened in a while to the cloud or Keep all my old files on my computer
- Choose Save disk space by sending all files I haven’t opened in a while to the cloud to set files downloaded to your device back to cloud-only after 30 days.
- Choose Keep all my old files on my computer to keep all your files downloaded to device.
Note: individual file and folder settings override these defaults.
Bulk actions:
- Store all my files in the cloud now – Frees up the maximum amount of space by setting all files and folders in your Sync folder to cloud-only. Overrides individual file or folder settings.
- Download all my files now – Set all all files and folders in your Sync folder to always keep on this device. Over-rides individual file or folder settings.
Using the Quick Action menu to share and open on web
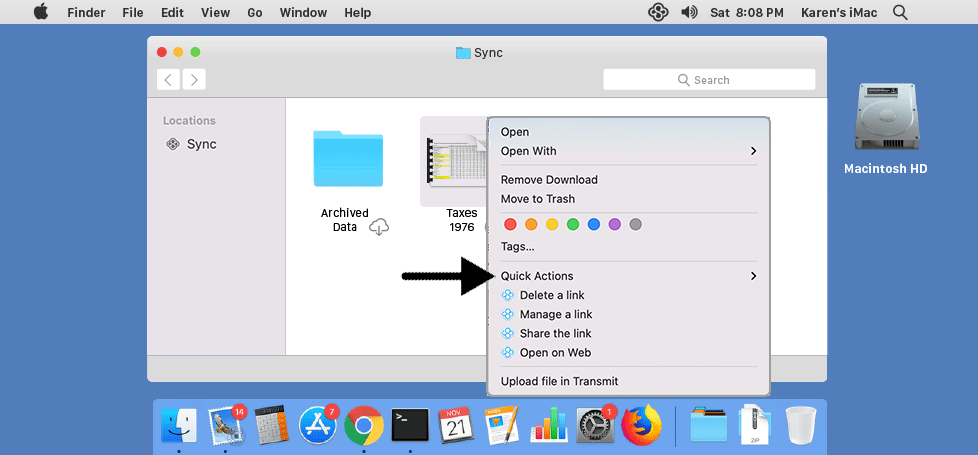
The Sync desktop adds additional menu items to the Mac Finder, making it easy to share files as links, jump to share folder management, and go directly to the web panel.

Accessing the Quick Action menu:
- Click the Sync icon on the Mac menu bar.
- Click the Sync folder icon.
- Right-click any file or folder in the Sync folder.
Menu options:
- Create a link – Creates a sharable link to a file or folder and copies the link to your clipboard
- Share a link – Copies the link to your clipboard if it already created
- Delete a link – Removes the link (does not delete the file)
- Manage share – Available on team shared folders that have been previously been created
- Open on web – Opens the web panel in your default web browser, to access all Sync features related to the file or folder
Desktop app settings
Desktop app settings are specific to the computer you have installed Sync on.
Access the Sync desktop app preferences:
- Click the Sync icon on the Mac menu bar.
- Click the Settings icon.
- Select Preferences from the menu.
Options tab:
- Run When Computer is Started – Sync automatically starts when you sign into your computer. With this option disabled you would have to manually start Sync. Enabled by default.
- Show Desktop Notifications – The Sync app displays pop-up notifications to let you know when files have been updated. Enabled by default.
- Show Icon Overlays – The Sync app displays status icons over every file and folder in the Sync folder when enabled. Enabled by default.
- Report Errors to Server – When the Sync app encounters an error, a crash report and application logs are sent to our team for further review. This helps us improve the app.
Account tab:
- Change password – Change a forgotten password directly from the desktop app. This feature can be disabled.
- Export a listing of all files – Click Generate to download a .CSV document listing all files in your Sync folder and Vault. This is useful for auditing everything you have in Sync.
- Uninstall – See the how to uninstall Sync section for more details.
Network tab:
- Disk Cache – To improve performance, the Sync app temporarily stores file data in a hidden cache folder, located inside the Sync folder. The temporary cache takes up additional space on your computer and is automatically cleared from time to time. Manually clear the cache or adjust the automatic cleanup schedule.
- Configure a Network Proxy – This advanced network configuration helps enable Sync to work behind a SOCKS5 VPN service. The default proxy type is Automatic (no proxy).
- SSL Certificates – Configures Sync to trust third-party SSL certificates typically used to ensure compatibility with corporate firewalls. Disabled by default.
Progress tab:
- The progress tab provides file transfer details, and lists any files or folders that are not syncing. If your files are not syncing, this is a good place to start troubleshooting.
CloudFiles tab:
- Note: CloudFiles Default settings are configurable on macOS 13+. If you’re running macOS 11 or 12, CloudFiles is available at the file and folder level only (this tab will not be visible).
- Adjust the default CloudFiles settings to control when files and folders are downloaded to your computer.
- Run bulk actions make all your files cloud-only or download all files. Click here for details
Advanced tab:
- Note: Note: The selective sync feature has been replaced by CloudFiles. If you don’t see the Advanced tab, then you’re running the CloudFiles app. Click here for more info.
Pause and resume the desktop app
The Sync desktop app runs automatically whenever you are signed into your computer. You can manually pause or resume Sync as follows:
- Click the Sync icon on the Mac menu bar.
- Click the Settings icon.
- Select Pause Sync or Resume Sync from the menu.
Updating the Sync desktop app to the latest version
You can manually update Sync as follows:
- Quit Sync by clicking the Sync icon on the Mac menu bar, then click the Settings Cog, and Choose Quit Sync.
- Download the latest desktop app installer to your computer. The installer will upgrade an existing installation automatically.
- Double click the .dmg file to open it.
- Drag the Sync app to the Applications folder (it will prompt you to overwrite the existing app, click yes).
- Navigate to the Applications folder and launch the Sync app to start the installer:
- Launch Finder (click on Finder on the Dock).
- From the Favorites sidebar click Applications.
- From the Applications folder click Sync and follow the installation prompts.
- Sync will detect an existing installation and ask you to update it. Click Yes.
- The installer will detect your existing account. Ensure Reuse existing account is checked, and click Next.
- Click Finish to exit the installer.
What version of Sync am I currently running?
- Click the Sync icon on the Mac menu bar.
- Click the Settings icon.
- Select Preferences from the menu.
- Click the Account tab.
- The version is displayed at the bottom of the Account tab
Uninstalling Sync on Mac
There are two ways to uninstall Sync:
To remove all traces of the Sync application, including system configuration information, download and run the full uninstaller, and follow the prompts:
https://www.sync.com/download/sync-uninstaller.dmg
Note: The uninstaller does not delete the existing Sync folder on the computer to help prevent unintentional data loss. After the uninstall is complete you will need to manually delete the Sync folder if needed.
A soft uninstall allows you to restore your Sync account on the same computer at a later date, by retaining system configuration information:
- Click the Sync icon on the Mac menu bar.
- Click the Settings icon.
- Select Preferences from the menu.
- Select the Account tab.
- Click the Uninstall button and follow the prompts.
I upgraded from an older version of Sync for Mac, what’s changed?
Our latest CloudFiles-enabled desktop app offers a modern approach to file syncing, allowing you to free up space on your computer. To maintain forward-compatibility with Apple, we’ve made the following changes:
- Selective Sync – The selective sync feature found under the desktop app Advanced tab on older versions of the Sync app has been replaced by CloudFiles. Use CloudFiles to control which files and folders are synced to your computer, similar to selective sync.
- External drives and custom Sync folder locations – No longer supported due to forced changes Apple has made at the file system level. We hope that Apple will change their stance on this.
- Copy to Vault Finder integration – No longer supported due to forced changes Apple has made at the file system level. Use the web panel to upload files and folders to Vault.
- Sync status icons – Status icons are visible when files are uploading, downloading, or set to cloud only. You will no longer see a status icon when a file is in Sync.